Setting the scan resolution
When you make scans, it's important to use an appropriate resolution. If you use too low a resolution, you'll lose quality in the output. If you use too high a resolution, you're including unnecessary detail that the output medium can't reproduce; this fills up your disk more quickly, and gives Animo 2.0 more work to do - which slows it down.
The resolution at which you should scan depends on:
- Whether the scan is to be a part of final output.
- You can use a very low resolution if you're scanning artwork for a layout or leica; so long as it's good enough for your needs, that's all that matters.
- The output medium.
- Video does not have as high a resolution as film; if you're scanning artwork that is only for video use, you can use a lower resolution than for film.
- The amount you are going to zoom in.
- The more you are going to zoom in, the higher a resolution you require.
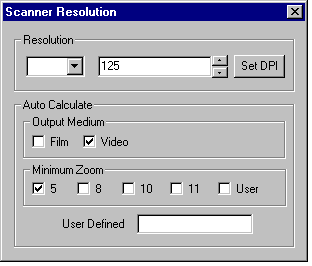
To set the resolution, click on the Resolution button. The Scanner Resolution dialog box appears:

Use the AutoCalculate buttons to work out the correct resolution for the scans of the girl in the example:
- The Output Medium buttons set the output medium. For example, if you're going to output to video, ensure the Video button is checked.
- The Minimum Zoom buttons set the minimum field size at which your drawing will be seen. For example, if you were going to zoom in to a fielding of 5 fields, you would click on the Minimum Zoom button for 5 field.
- If there isn't a button that matches your minimum fielding, you can instead click on the User button and type a User Defined fielding size.
Animo 2.0 uses this information to calculate the required resolution in dpi (dots per inch). It displays this at the top of the window. You've now set the resolution, so close the dialog box.
We advise that you make all scans in a level at the same resolution. If you change the resolution while you are scanning in a level, a warning message will be displayed.